目前掌柜团队内部缺少组件发布平台,每次 App 发版都需要组件负责人去发布自己名下涉及的组件。这中间存在组件间依赖以及发布时间差问题,上层组件需要依赖下层组件的发布,负责人之间沟通起来极为耗时。所以团队暂时没有限制私有源仓库的推送权限,当发布时间比较紧时,方便负责人绕过 lint, 直接推送 podspec 到私有源仓库。
虽然这种发布方式能节省一部分时间,但是容易出现下层组件 lint 失败向上层传递的情况。久而久之,lint 不通过的组件将会越来越多。为了尽量避免这种情况的发生,引入 CI 对组件进行 lint 监测是个不错的选择。
以上就是掌柜团队当初引入 CI 的初衷。不过 CI 能带来的便利远不止如此,当然,这都是后话了。
GitLab CI
本文使用 GitLab Community Edition 10.4.0 版本
GitLab 在 8.0 版本之后,就集成了 GitLab CI ,随着版本的迭代,其功能越来越强大。使用者只需要在仓库根目录下 (可以通过仓库的 Setting -> CI/CD -> General pipelines settings -> Custom CI config path 设置加载路径,默认根目录)添加 .gitlab-ci.yml 配置文件,并且存在可用的 GitLab Runner ,就可以实现持续集成。
如果在仓库中没有发现 CI/CD 设置项,则需要到 Setting -> CI/CD -> Permissions -> Pipeline 打开设置。
首先需要明确的是和 GitLab CI 任务相关的几个概念: pipeline、stage、job。
pipeline
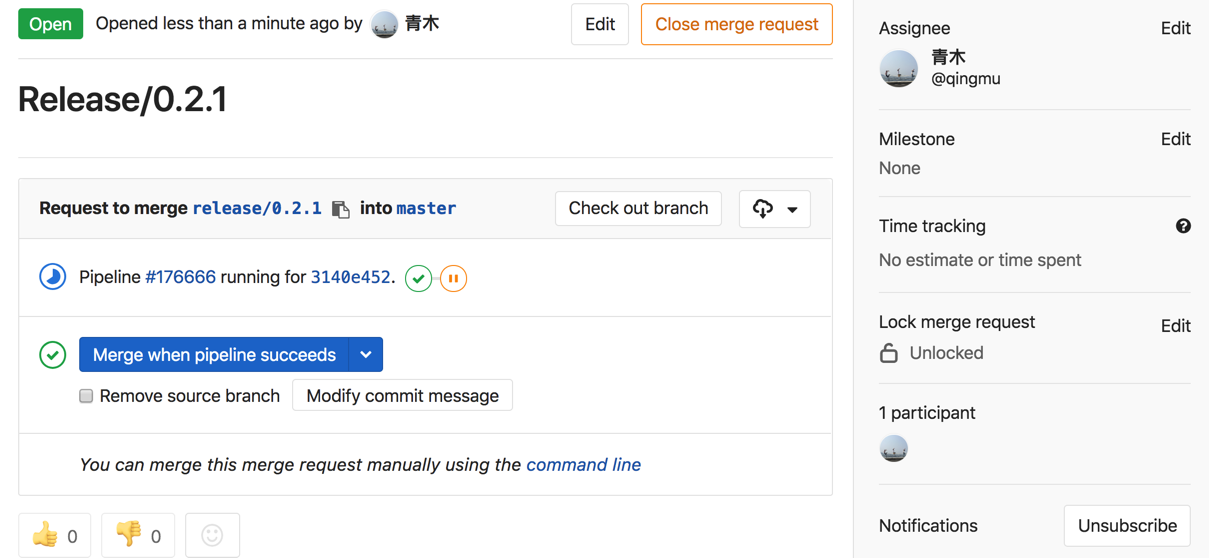
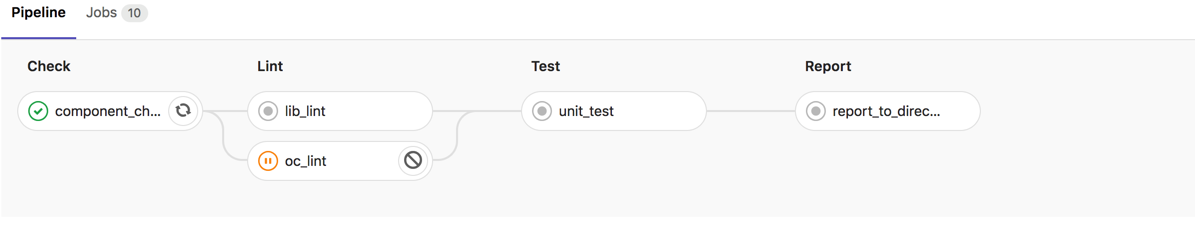
pipeline 实际是一组 stages 中执行 job 的集合,代表着使用者触发的一次构建 。任何提交,包括 MR 在符合配置文件要求的情况下都可以触发 pipeline,其在网页中的体现如下:

stage
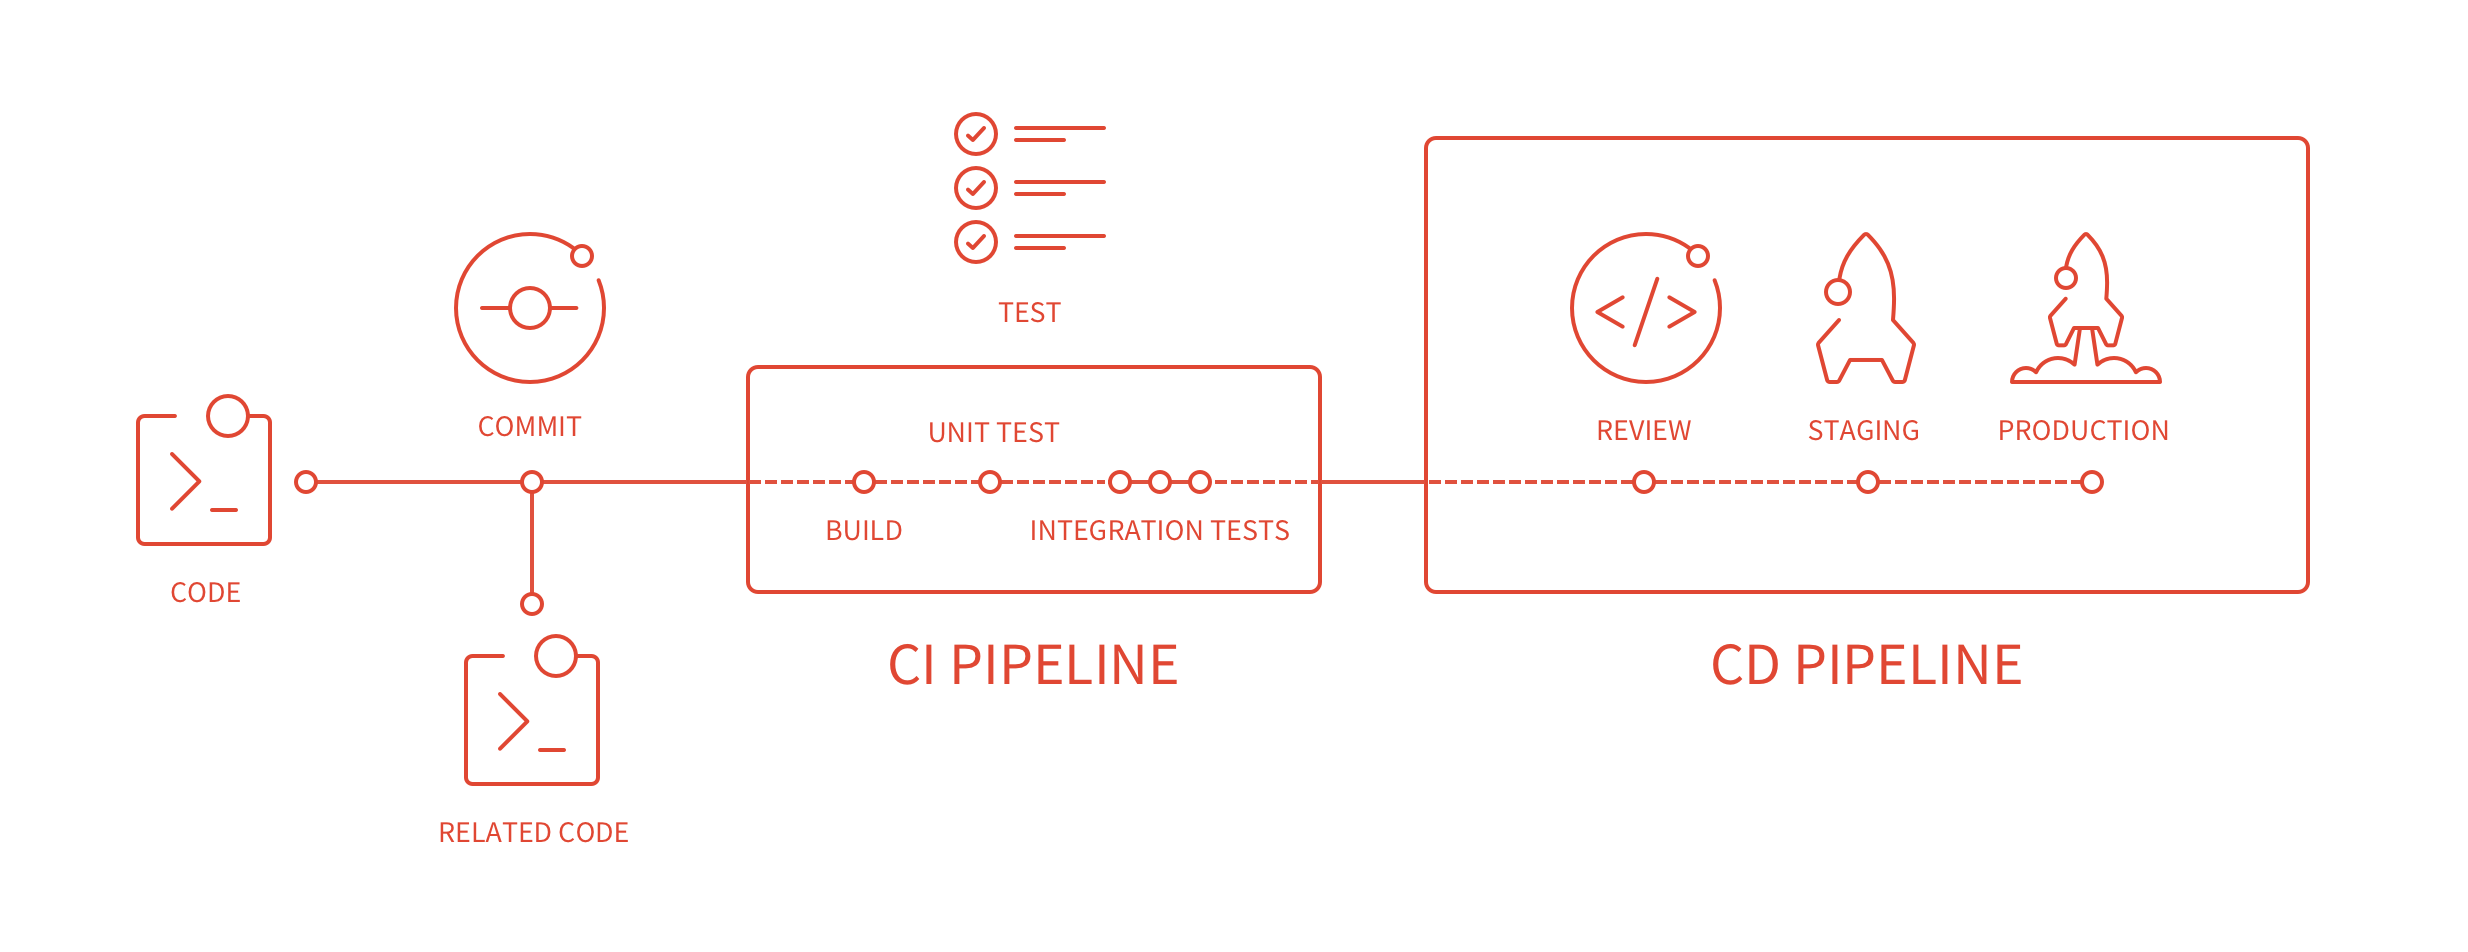
pipeline 中的 jobs 按照构建阶段进行分类,这些分类就是一个个 stage 。如 pipeline 示意图所示,一个 pipeline 中可以定义多个 stage ,比如 build, test, staging, production,其对应配置语法如下:
1 | stages: |
stage 的触发顺序和 stages 字段值定义的顺序一致,并且只有完成当前 stage , pipeline 才会触发下一个 stage ,如果 stage 失败了,则下一个 stage 将不会被触发,完成所有的 stage 表示此次 pipeline 构建成功。
job
job 表示 stage 中实际执行的任务。如 pipeline 示意图所示,一个 stage 中可以有多个 job,比如 Test stage 的 test1、test2 job,其对应配置语法如下:
1 |
|
在有足够 runner (job 执行宿主机) 的情况下,同个 stage 中的 job 是并行的,当 stage 中的所有 job 都执行成功后,该 stage 才算完成,否则视为失败。
GitLab Runner
下文操作基于 macOS 系统
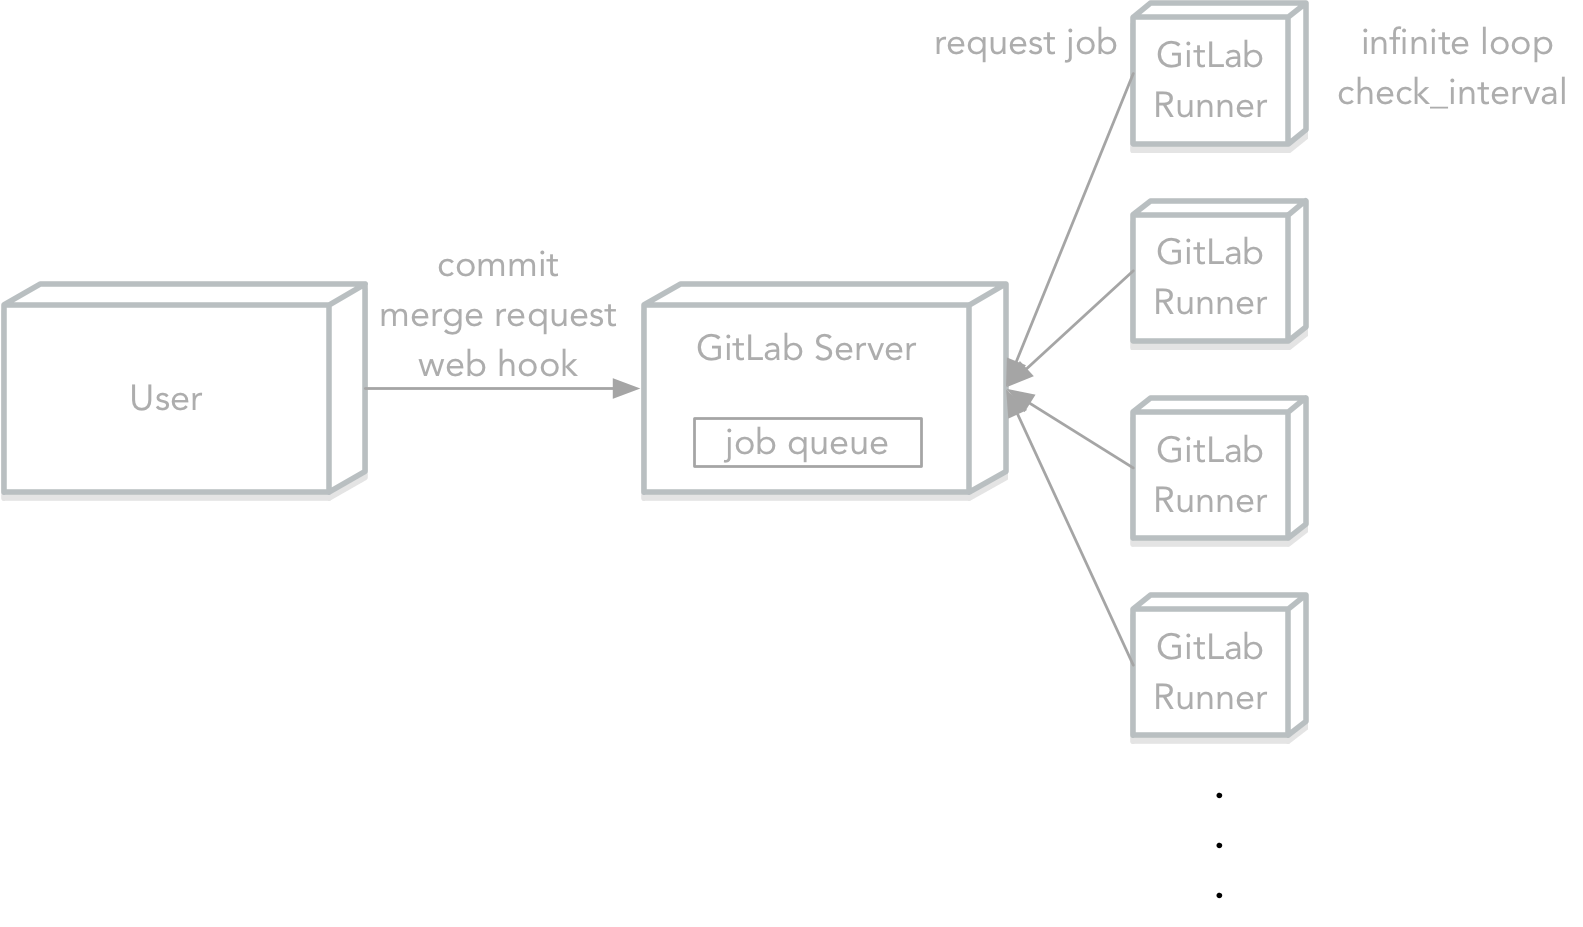
GitLab Runner 和 GitLab 的关系大体如上所示, GitLab Runner 内部会起一个无限循环,根据 check_interval 字段设置的时间间隔,去 GitLab 请求需要执行的任务。更详细的信息可以查看 How shared Runners pick jobs ,How check_interval works。
GitLab Runner 按服务对象可划分 shared runner 和 specific runner ,10.8 版本后还有 group runner,三者应用场景如下:
- shared runner
- 主要针对要求配置相似的工程,可以运行不同仓库上的任务。
- specific runner
- 主要针对要求特殊配置的工程,只能运行特定仓库上的任务。
- group runner
- 主要针对某个分组下的所有工程(10.8 及以后版本才有)。
因为团队内部对工程进行了组件化,所以 specific runner 是比较合适的选择,也利于后期向其他业务线推广 CI 。 specific runner 注册需要 shared-runner token ,这个 token 只有 admin 账户可见,一般找 GitLab 的管理人员获取即可。以下为注册成功页(工程页 -> CI / CD -> Runners setting):
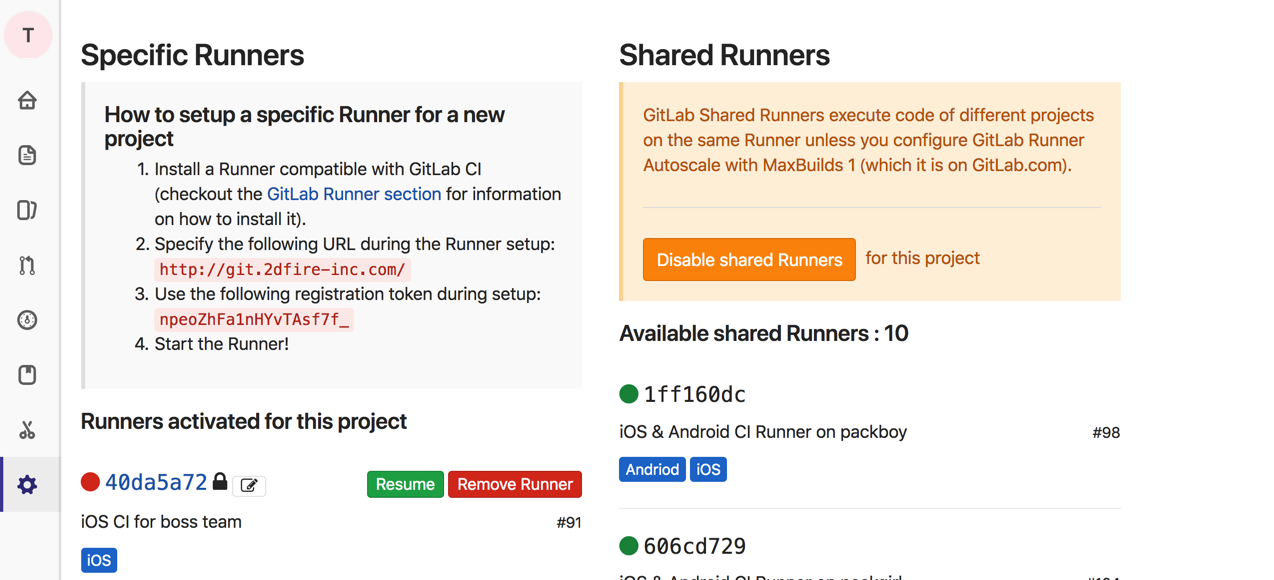
左边为注册的 specific runner ,使用上方显示的 npeoZhFa1nHYvTAsf7f_ token 即可,右边即是注册成功的 shared runner,运行状态为绿色表示正在运行。
接下来看下如何在 macOS 上安装注册 GitLab Runner。
安装 Gitlab Runner
In GitLab Runner 10, the name of the executable was renamed from gitlab-ci-multi-runner to gitlab-runner
通过 homebrew 安装:
1 | brew install gitlab-runner |
随着 GitLab Runner 10 的发布,其可执行文件已经从 gitlab-ci-multi-runner 更名为 gitlab-runner,如果需要访问旧版本,可以访问这里下载手动安装 。
注册 Gitlab Runner
1、注册 runner
Currently, the only proven to work mode for macOS is running service in user-mode.
1 | gitlab-runner register |
对应的反向操作:
1 | gitlab-runner unregister -u url -t token |
截止到 GitLab Runner 10, MacOS 中已验证可行的运行模式是用户模式,使用系统模式 (sudo) 注册的 Runner 会一直处于 Stuck 状态。
2、输入 GitLab URL 地址
1 | Please enter the gitlab-ci coordinator URL (e.g. https://gitlab.com ) |
3、输入注册 Runner 需要的 Token
1 | Please enter the gitlab-ci token for this runner |
Token 分为 special token 和 shared token,前者在项目设置页可以拿到,后者只能联系 GitLab 管理员或者有 Admin 权限的情况下获得。注册后,会分别成为 special runner 和 shared runner。
4、输入标志 Runner 的 Tags
1 | Please enter the gitlab-ci tags for this runner (comma separated): |
.gitlab-ci.yml 中可以设置 tags 字段来声明,当前任务只在拥有匹配 Tags 的 Runner 上运行。比如 iOS 编译阶段只能在 Mac Runner 上运行,那么就可以设置这个 Runner 的 Tags 为 ‘iOS’,并且在 iOS 工程中在字段 tags 中,添加‘iOS’ 值。 Tags 最好不要随便命名,遵循适当的命名规则会让后期 CI 的维护轻松许多。
5、是否允许运行没有设置 tags 的任务
1 | Whether to run untagged jobs [true/false]: |
可以在 GitLab 界面上更改 ,一般为 false。
6、是否锁定当前工程
1 | Whether to lock Runner to current project [true/false]: |
在 Runner 是 special 的情况下比较有用,可以在 GitLab 界面上更改。
7、Runner 执行者
1 | Please enter the executor: ssh, docker+machine, docker-ssh+machine, kubernetes, docker, parallels, virtualbox, docker-ssh, shell: |
一般为 shell。
8、选择 docker 为执行者时,需要设置默认的 docker image
1 | Please enter the Docker image (eg. ruby:2.1): |
非 docker 执行者,没有这一步。
启动/关闭 Gitlab Runner
执行以下命令安装 runner 服务,并且启动它:
1 | gitlab-runner install [--working-directory] |
如已经启动 runner 服务,添加了新的 runner ,直接执行 gitlab-runner start 即可。
关闭操作:
1 | gitlab-runner stop |
需要注意的是, 在不加 --working-directory 参数的情况下,runner 工作目录默认为执行 install 命令目录 ,触发了任务后,runner 会在此目录下创建 builds 文件夹 。
更多关于 runner 的命令,可以查看 GitLab Runner Commands
配置GitLab Runner
注册后 runner 的配置信息默认保存在 ~/.gitlab-runner/config.toml 文件中,其文件格式如下:
1 | concurrent = 1 |
文件分为 Global Section 和 [[runners]] Section 两部分,这里只说下常用字段,想要了解更多信息,可以查看 GitLab Runner advanced configuration 。
Global Section 常用部分:
| Setting | Description |
|---|---|
concurrent |
可并发执行的最大任务数,0 不代表无限制 |
log_level |
Log 等级 (可选择: debug, info, warn, error, fatal, panic)。优先级比通过命令行 —debug, -l 或 –log-level 设置低 |
check_interval |
设置轮询新任务的周期,单位(秒)。默认值为 3 秒,如果设置为 0 或者比 3 小,此字段使用默认值。 |
这里需要注意的是, CocoaPods 1.3.0 Release Blog 在 Notable Enhancements 一节指出:
Each lint execution now runs in a unique temp folder. This allows for running multiple lint processes in parallel, for example within a CI environment.
也就是说, 在 1.3.0 版本之前,由于共用了承载 lint 操作的文件夹, CocoaPods 并不支持多个组件同时进行 lint。这就需要我们在设置 runner 的 concurrenct 配置时,确认实际使用的 CocoaPods 版本,如果低于 1.3.0 ,concurrenct 必须设置成 1 。
[[runners]] Section 常用部分
| Setting | Description |
|---|---|
name |
runner 名称 |
url |
GitLab URL |
token |
runner 专有 token (不是注册 runner 时输入的 GitLab token),unregister 时可以使用 |
limit |
这个 token 下可并发执行的最大任务数,默认 0 ,表示无限制(需要结合上述 CocoaPods 1.3.0 版本以下的限制考虑) |
builds_dir |
runner 工作目录,默认会在 install 目录下创建 builds 文件夹 |
cache_dir |
cache 保存目录 |
environment |
添加/覆盖环境变量,如 environment = ["ENV=value", "LC_ALL=en_US.UTF-8"] |
output_limit |
输出 log 大小限制,默认 4096 (4M),建议设置成 4096000 |
pre_clone_script |
clone 之前执行的脚本,可以用来调整 Git 客户端配置 |
pre_build_script |
clone 之后,build 之前执行的脚本 |
post_build_script |
build 之后,after_script 之前执行的脚本 |
clone_url |
自定义 clone 仓库的 url |
配置 .gitlab-ci.yml
1 | before_script: |
以上是掌柜团队目前采用的 .gitlab-ci.yml 配置,涉及的关键字在官方文档 Configuration of your jobs with .gitlab-ci.yml 有非常详细的介绍,这里不做赘述,只说下这样配置的几点考虑。
1、所有 stage 脚本,都保存在 ci-yaml-shell 仓库中,在执行 global before_script 时下载(通过 ssh ,不受 GitLab CI 权限影响)。这是因为工程在组件化后会产生非常多的仓库 ,这样做有利于 CI 脚本的统一修改和管理,只要在每个仓库的 .gitlab-ci.yml配置中预留足够多的入口即可,后期修改调试比较方便。比如需要新增 xcpretty 依赖,只需在 before_shell_executor.sh 脚本中添加 gem install xcpretty --no-ri --no-rdoc 即可辐射到所有组件。
2、考虑到组件集成 CI 时,最好能创建相应的调试分支,我们在 check、test、lint 三个 stage 的 only 字段中都添加了 CI 分支。由于在调试阶段,此分支的 CI 执行结果并且不会推送至钉钉。package 和 publish 已经是 CD 阶段了,所以只在提交 tags 时触发。
3、掌柜团队采用 GitFlow 工作流 (在组件较多的情况下,维护 master 和 develop 两个相似分支的工作量比较大,后期会考虑优化工作流,比如采用 GitLab Flow,或者自定义 GitHub Flow),在提交 MR (release -> master) 时需要触发 CI ,当 CI 成功后方可合并,所以在 component_check 和 lib_lint 两个 job 的 only 字段中都添加了 /^release.*$/ 正则。
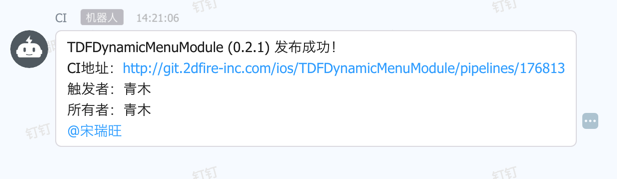
4、report stage 负责在 CI 执行失败后,推送钉钉消息 @ 相应的负责人和触发者,这块思路可以参照 编写自己的 CocoaPods 插件,后期我也重构并优化了这块代码。 publish stage 在发布组件成功后,同样会推送钉钉消息。
5、stage 的失败条件是任务最后一个执行的命令返回非零结果 ($?),所以在编写 shell 脚本的时候需要注意,如果有 shell 命令执行抛错了,要提前 exit :
1 | # framework_pack_executor.sh |
否则即使 shell 脚本中间有某些命令执行失败,但最后一个命令执行成功,stage 最终结果也会是成功的。如果是 ruby 脚本,比如上方配置的 component_check 任务 ,就可以规避这个问题,直接 raise 即可。
6、由于所有配置都在 ci-yaml-shell 仓库中,会导致安装的 gem 依赖都是一致的,如果其他业务线使用不同版本的CocoaPods ,可能会导致 CI 报错。所以组件仓库可以添加自己的 Gemfile ,定制 gem 依赖,脚本会对这种情况进行兼容 :
1 | # publish_executor.sh |
7、component_check 这个入口主要对组件进行一些简单快速的校验,比如我们针对目前掌柜团队组件中存在的一些问题,设置的 podspec 校验:
1 | # validate_specification.rb |
这些校验自动监测了组件规范,可以减少一些组件的人工维护成本。
以下分别是 master、tags、release 分支触发 CI 后的 pipeline 截图:


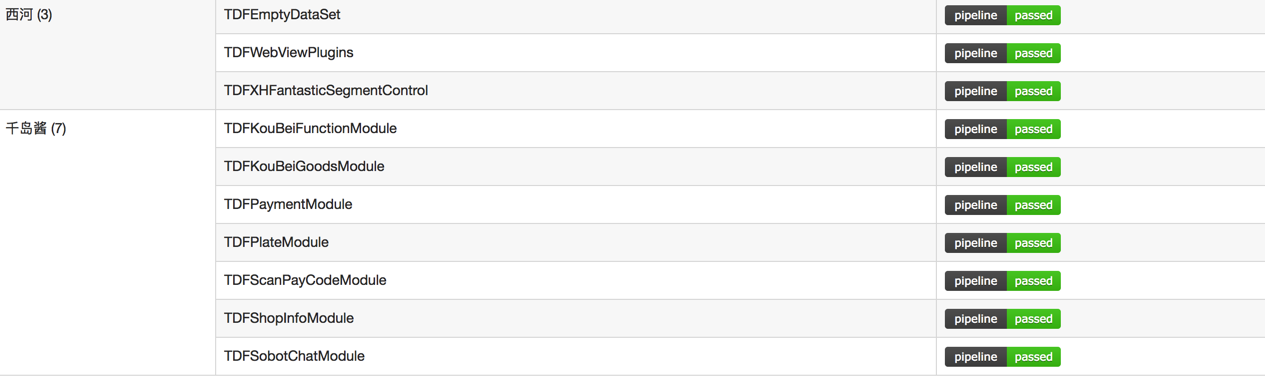
master 和 tags 触发的 CI 会将执行结果推送至钉钉,release 分支推送比较频繁,所以只执行了两个必须的 stage,减少 runner 资源的占用。由于 master 是线上分支,必须进行最严格的检查,而 tags 主要是进行 CD 操作,为了加快组件的发布,省略了一些检测任务。为了更加清晰地展示所有组件的 CI 执行结果,可以利用 cocoapods gem 获取私有源的所有组件,并将 pipeline badge 展示在网页上:
在开发中,可能会遇到不想触发 CI 情况,这时只需要让 commit 信息包含 [ci skip] 或者 [skip ci] (不分大小写)即可。
提示汇总
编码错误
搭建 CI 时,发现只有 shared runner 会因为编码问题而执行失败,special runner 仅仅报了 warning。
根据 CI: How to set UTF-8 in the server? 和 xcpretty US-ASCII encoding problems 上的解答,可以在 before_script 下添加以下配置:
1 | - export LANG=en_US.UTF-8 |
unit test 出现 Scheme is not currently configured for the test action
这个问题分为必现和概现两种情况,先说必现的情况。
执行单测时,需要在对应 scheme 下添加 test targets:
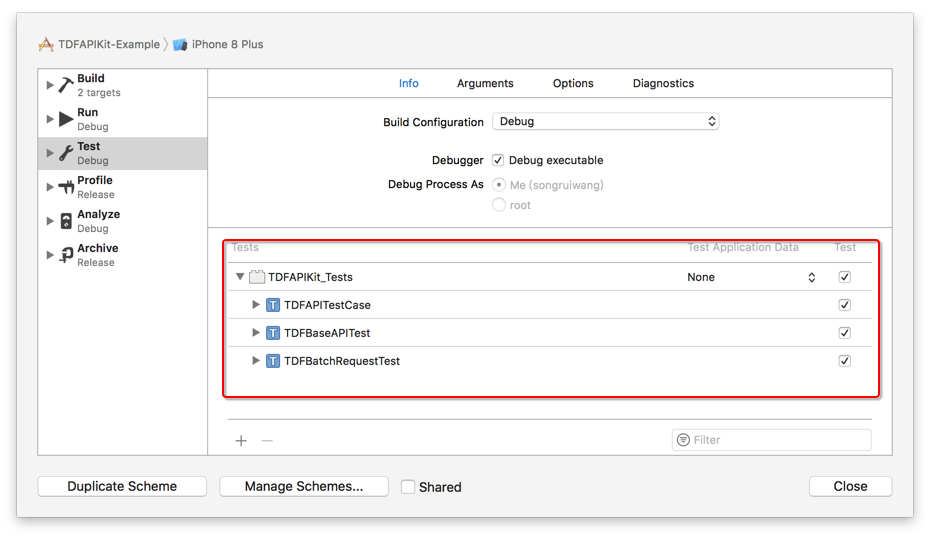
一般 Xcode 会在创建工程时,默认添加这些配置。如果发现此栏没有问题, CI 的单测还是提示 action 错误,那就要排查下是否是 .gitignore 引起的问题了。
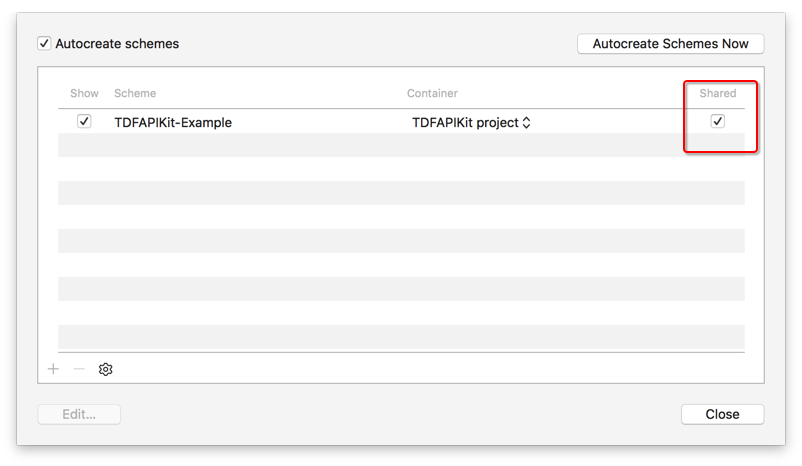
在我们点击 Edit Scheme / Manager Schemes 后,会发现每个 scheme 都会有个 shared 选项,勾选了之后,就会在 *.xcodeproj/xcshareddata/xcschemes 目录下生成相关文件,里面存储了可以在版本控制系统共享的项目配置。
在没有勾选时,项目配置都保存在 *.xcodeproj/xcuserdata 目录下,一般针对 iOS 工程的 .gitignore 都会包含以下条目:
1 | xcuserdata/ |
这就导致即使本地正确地设置了 scheme ,可以正常运行单测 ,远程 runner 执行相应操作时,还是获取不到正确的配置。所以要添加单测的组件, scheme 这栏一定要勾选 shared 。
接下来说下概现的情况。
先看下的 pod lib create 获取老 pod-template 工程所暴露的问题 :pod lib create generates a project that randomly crashes when running tests
简单来说,就是有两个 scheme 重名了 (工程 scheme,及 pod 生成的组件 scheme), xcodebuild 无法找到正确的 scheme 执行单测。
事实上,手动创建的工程也会存在这个问题,其工程结构和老 pod-template 相似。
要规避这两种情况,最简单的方法就是使用 pod lib create 拉取新的 pod-template,将旧工程直接挪过去。我们也可以根据自己的需求,创建私有 pod-template,然后通过指定 --template-url 获取。
Pipeline Job 卡在 Cloning repository…,Runner 宿主机提示输入 Keychain 密码
登录 runner 的宿主机后,可以看到提示如下:
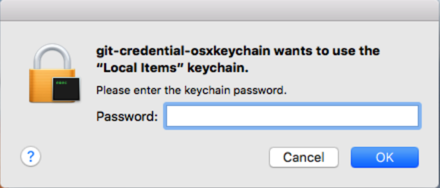
runner 默认通过 http / https 对代码进行 clone / fetch ,在没有配置用户名密码,或配置错误时,就会出现如上提示。输入密码后,一段时间内可以正常下载代码,过了有效时间,又会弹出上方提示框。
参照 Git-工具-凭证存储,我们使用 store 模式来处理凭证信息(这里更推荐使用 osxkeychain 模式,可以参照 disable git credential-osxkeychain ),创建 .gitconfig 如下:
1 | [credential] |
--file 是 store 模式用来自定义存放密码的文件路径(默认是~/.git-credentials)。.git-credentials 文件内容格式如下:
1 | https://用户名:密码@GitHost |
设置完后,可以使用 git config --list 查看配置信息,注意 helper 的先后顺序会影响最终执行结果。
如果有需要用到 ssh 的情况,可以参考 GitLab Runner The runners ssh section,Using SSH keys with GitLab CI/CD,How do I enable cloning over SSH for a Gitlab runner?
xcodebuild 编译时无法找到对应模拟器的 OS 版本
xcodebuild 编译时需要指定 -destination 参数,在有多台 runner 的情况下,模拟器对应的 OS 版本是未知的,所以不能在脚本中写死,可以通过以下方式统一使用 iPhoneX :
1 | build_destination(){ |
兼容 -Example scheme
xcodebuild 编译时需要指定 -scheme 参数,pod lib create 创建的工程 scheme 名称都以 -Example 结尾,手动创建的工程则一般和文件夹名一致,可以通过以下脚本获取 scheme 的名称:
1 | infors = `xcodebuild -list`.split("\n").map(&:strip) |
GitLab Runner failed to requeue the runner
遇到这类错误,网页输出就提供不了什么有价值的信息了:
1 | Running with gitlab-runner 10.6.0 (a3543a27) |
这时就需要 ssh 到 runner 的宿主机,使用 --debug 模式重启 runner :
1 | gitlab-runner --debug run |
然后在此 runner 上触发任务:1
2
3
4
5
6
7
8
9
10
11
12
13
14
15
16
17
18
19
20
21
22
23
24
25Checking for jobs... nothing runner=2ac70a89
Feeding runners to channel builds=0
Checking for jobs... received job=259319 repo_url=http://git.2dfire-inc.com/ios/TDFWebViewKit.git runner=2ac70a89
Failed to requeue the runner: builds=1 runner=2ac70a89
Running with gitlab-runner 10.6.0 (a3543a27) job=259319 project=2941 runner=2ac70a89
on iOS Runner on packsun 2ac70a89 job=259319 project=2941 runner=2ac70a89
Shell configuration: environment: []
dockercommand:
- sh
- -c
- "if [ -x /usr/local/bin/bash ]; then\n\texec /usr/local/bin/bash --login\nelif [
-x /usr/bin/bash ]; then\n\texec /usr/bin/bash --login\nelif [ -x /bin/bash ]; then\n\texec
/bin/bash --login\nelif [ -x /usr/local/bin/sh ]; then\n\texec /usr/local/bin/sh
--login\nelif [ -x /usr/bin/sh ]; then\n\texec /usr/bin/sh --login\nelif [ -x /bin/sh
]; then\n\texec /bin/sh --login\nelse\n\techo shell not found\n\texit 1\nfi\n\n"
command: bash
arguments:
- --login
passfile: false
extension: ""
job=259319 project=2941 runner=2ac70a89
Using Shell executor... job=259319 project=2941 runner=2ac70a89
Waiting for signals... job=259319 project=2941 runner=2ac70a89
WARNING: Job failed: exit status 1 job=259319 project=2941 runner=2ac70a89
Submitting job to coordinator... ok job=259319 runner=2ac70a89
解决方案是在 .bashrc / .bash_profile 中添加 unset cd 。详细讨论可以查看 ERROR: Build failed with: exit status 1 。
参考
Configuration of your jobs with .gitlab-ci.yml
Install GitLab Runner on macOS
Introduction to pipelines and jobs
A Ruby wrapper and CLI for the GitLab API