当app需要切换显示的图片少时,可以使用创建多个UIImageView,来实现多个图片切换显示;但是在图片较多时,这种做法显得很耗内存。所以以下总结了一下自己知道的几个方法与实现,并做了一个简易的封装。
采用三个UIImageView+UIScrollView
核心步骤
- 在图片显示完全(endDecelerating)时,重新设置三个UIImageView的图片内容
- 调整UIScrollView的偏移量,始终显示中间的UIImageView
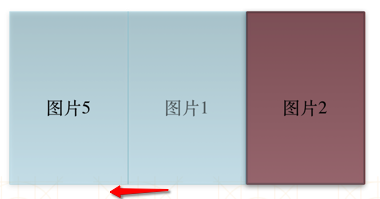
如有图片1、2、3、4、5,默认存放图片5、1、2,显示中间图片1:
- 向后滚动,显示图片2
- 图片显示完全时,重新设置UIImageView中的图片为图片1、2、3
- 设置UIScrollView的偏移量,使其显示中间的UIImageView,即图片2
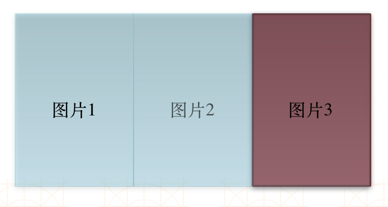
- 向后滚动,显示图片3
- 图片显示完全时,重新设置UIImageView中的图片为图片2、3、4
- 设置UIScrollView的偏移量,使其显示中间的UIImageView,即图片3
向前滚动同理。
如下图所示:
- 初始时显示图片1,然后向左滑动

- 滑动完成时显示的是图片2
- 在滑动完成时,修改UIImageView显示的内容如下图所示
- 接着上一步,立即修改UIScrollView的偏移量,使其显示中间的UIImageView,即图片2
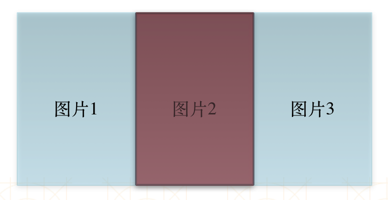
如上,最终结果显示的都是最中间的UIImageView,看起来像是无限个UIImageView一样
核心代码
核心
另一种写法[更加简洁]:
.m1
2
3
4
5
6
7
8
9
10
11
12
13
14
15
16
17
18
19
20
21
22
23
24
25
26
27
28
29
30
31
32
33
34
35
36
37
38
39
40
41
42
43
44
45
46
47
48
49
50
51
52
53
54
55
56
57
58
59
60
61
62
63
64
65
66
67
68
69
70
71
72
73
74
75
76
77
78
79
80
81
82
83
84
85
86
87
88
89
90
91
92
93
94
95
96
97
98
99
100
101
102
103
104
105
106
107
108
109
110
111
112
113
114
115
116
117
118
119
120
121
122
123
124
125
126
127
128
129
130
131
132
133
134
135
136
137
138
139
140
141
142
143
144
145
146
147
148
149
150
151
152
153
154
155
156
157
158
159
160
161
162
163
164
165
166
167
168
169
170
171
172
173
174
175
176
177
178
179
180
181
182
183
184
185
186
187
188
189
190
191
192
193
194
195
196
197
198
199
200
201
202
203
204
205
206
207
208
209
210
211
212
213
214
215
216
217
218
219
220
221
222
223
224
225
226
227
228
229
230
231
232
233
234
235
236
237
238
239
240
241
242
243
244
245
246
247
248
249
250
251
252
253
254
255
256
257
258
259
260
261
262
263
264
265
266
267
268
269
270
271
272
273
274
275
276
277
278
279
280
281
282
283
284
285
286
287
288
289
290
291
292
293
294
295
296
297
298
299
300
301
302
303
304
@interface TPCPageScrollView() <UIScrollViewDelegate>
@property (weak, nonatomic) UIScrollView *scrollView;
@property (weak, nonatomic) UIPageControl *pageControl;
@property (weak, nonatomic) UIImageView *leftImageView;
@property (weak, nonatomic) UIImageView *currentImageView;
@property (weak, nonatomic) UIImageView *rightImageView;
@property (strong, nonatomic) NSTimer *timer;
@property (assign, nonatomic, getter=isAutoPaging) BOOL autoPaging;
@end
@implementation TPCPageScrollView
/**
* 代码创建
*/
- (instancetype)initWithFrame:(CGRect)frame
{
if (self = [super initWithFrame:frame]) {
// 创建控件并初始化
[self setup];
[self createImageView];
}
return self;
}
/**
* 从storyboard或者xib加载
*/
- (void)awakeFromNib
{
// 创建控件并初始化
[self setup];
[self createImageView];
}
/**
* 创建控件并初始化
*/
- (void)setup
{
UIScrollView *scrollView = [[UIScrollView alloc] init];
scrollView.showsHorizontalScrollIndicator = NO;
scrollView.showsVerticalScrollIndicator = NO;
scrollView.pagingEnabled = YES;
scrollView.scrollEnabled = YES;
scrollView.delegate = self;
// 取消弹簧效果,不然拖动会出现问题
scrollView.bounces = NO;
UIPageControl *pageControl = [[UIPageControl alloc] init];
// 对于单个图片隐藏
pageControl.hidesForSinglePage = YES;
[self addSubview:scrollView];
[self addSubview:pageControl];
self.pageControl = pageControl;
self.scrollView = scrollView;
// 默认不开启自动切换图片
self.autoPaging = NO;
// 设置默认切图间隔
self.pagingInterval = kDefaultDuration;
}
/**
* 创建循环UIImageView
*/
- (void)createImageView
{
UIImageView *leftImageView = [[UIImageView alloc] init];
UIImageView *currentImageView = [[UIImageView alloc] init];
UIImageView *rightImageView = [[UIImageView alloc] init];
[self.scrollView addSubview:leftImageView];
[self.scrollView addSubview:currentImageView];
[self.scrollView addSubview:rightImageView];
self.leftImageView = leftImageView;
self.currentImageView = currentImageView;
self.rightImageView = rightImageView;
}
- (void)setImages:(NSArray *)images
{
_images = images;
// 设置默认图片
self.leftImageView.image = images[images.count - 1];
self.currentImageView.image = images[0];
self.rightImageView.image = images[1];
self.leftImageView.tag = images.count - 1;
self.currentImageView.tag = 0;
self.rightImageView.tag = 1;
//设置页数
self.pageControl.numberOfPages = images.count;
[self.scrollView setContentOffset:CGPointMake(imageViewW, 0)];
}
- (void)layoutSubviews
{
[super layoutSubviews];
// 因为外界可以动态改变frame,所以有关frame的设置都在layoutSubviews中设置
// 设置子控件的frame
self.scrollView.frame = self.bounds;
CGFloat imageViewW = self.scrollView.bounds.size.width;
CGFloat imageViewH = self.scrollView.bounds.size.height;
self.leftImageView.frame = CGRectMake(0, 0, imageViewW, imageViewH);
self.currentImageView.frame = CGRectMake(imageViewW, 0, imageViewW, imageViewH);
self.rightImageView.frame = CGRectMake(imageViewW * 2, 0, imageViewW, imageViewH);
// 设置UIScrollView滚动内容大小
self.scrollView.contentSize = CGSizeMake(imageViewW * 3, 0);
// 设置UIPageControl默认位置
CGFloat pageControlCenterX = self.bounds.size.width / 2.0;
CGFloat pageControlCenterY = self.bounds.size.height - kPageControlHeight / 2.0;
self.pageControl.center = CGPointMake(pageControlCenterX, pageControlCenterY);
}
- (void)scrollViewDidScroll:(UIScrollView *)scrollView
{
// 设置UIPageControl的页码
if (self.scrollView.contentOffset.x > self.scrollView.bounds.size.width * 1.5) {
self.pageControl.currentPage = self.rightImageView.tag;
} else if (self.scrollView.contentOffset.x < self.scrollView.bounds.size.width * 0.5) {
self.pageControl.currentPage = self.leftImageView.tag;
} else {
self.pageControl.currentPage = self.currentImageView.tag;
}
}
- (void)scrollViewDidEndDecelerating:(UIScrollView *)scrollView
{
// 手动拖拽切换更改内容
[self updateContent];
}
- (void)scrollViewDidEndScrollingAnimation:(UIScrollView *)scrollView
{
// 定时器切换更改内容
[self updateContent];
}
- (void)scrollViewWillBeginDragging:(UIScrollView *)scrollView
{
if (self.isAutoPaging) {
[self stopTimer];
}
}
- (void)scrollViewDidEndDragging:(UIScrollView *)scrollView willDecelerate:(BOOL)decelerate
{
if (self.isAutoPaging) {
[self startTimer];
}
}
- (void)setCurrentPageColor:(UIColor *)currentPageColor
{
_currentPageColor = currentPageColor;
self.pageControl.currentPageIndicatorTintColor = currentPageColor;
}
- (void)setOtherPageColor:(UIColor *)otherPageColor
{
_otherPageColor = otherPageColor;
self.pageControl.pageIndicatorTintColor = otherPageColor;
}
- (void)setPagingInterval:(NSTimeInterval)pagingInterval
{
_pagingInterval = pagingInterval > 0 ? pagingInterval : kDefaultDuration;
// 在开启自动切图的情况下,修改时间间隔会实时生效
if (self.isAutoPaging) {
[self startAutoPaging];
}
}
/**
* 以duration时间间隔,开启定时切换图片
*/
- (void)startAutoPagingWithDuration:(NSTimeInterval)pagingInterval
{
// 先停止正在执行的定时器
[self stopTimer];
self.autoPaging = YES;
self.pagingInterval = pagingInterval;
[self startTimer];
}
/**
* 开启自动切换图片
*/
- (void)startAutoPaging
{
// 先停止正在执行的定时器
[self stopTimer];
self.autoPaging = YES;
[self startTimer];
}
/**
* 停止自动切换图片
*/
- (void)stopAutoPaging
{
self.autoPaging = NO;
[self stopTimer];
}
/**
* 开启定时器
*/
- (void)startTimer
{
// 注册定时器
self.timer = [NSTimer timerWithTimeInterval:self.pagingInterval target:self selector:@selector(nextPage) userInfo:nil repeats:YES];
[[NSRunLoop mainRunLoop] addTimer:self.timer forMode:NSRunLoopCommonModes];
}
/**
* 关闭定时器
*/
- (void)stopTimer
{
if (self.timer) {
[self.timer invalidate];
self.timer = nil;
}
}
/**
* 下一张
*/
- (void)nextPage
{
// 防止layoutSubviews中,第一次偏移量还没更改时就执行
if (self.scrollView.contentOffset.x != 0) {
// 移动到第三个UIImageView
[self.scrollView setContentOffset:CGPointMake(self.scrollView.bounds.size.width * 2, 0) animated:YES];
}
}
/**
* 更新图片和索引数据
*/
- (void)updateContent
{
CGFloat scrollViewW = self.scrollView.bounds.size.width;
if (self.scrollView.contentOffset.x > scrollViewW) {
// 向前滚动,设置tag
// 先设置左边的tag为当前图片tag后,才改变当前图片tag
self.leftImageView.tag = self.currentImageView.tag;
self.currentImageView.tag = self.rightImageView.tag;
self.rightImageView.tag = (self.rightImageView.tag + 1) % self.images.count;
} else if (self.scrollView.contentOffset.x < scrollViewW) {
// 向后滚动,设置tag
// 先设置右边的tag为当前图片tag后,才改变当前图片tag
self.rightImageView.tag = self.currentImageView.tag;
self.currentImageView.tag = self.leftImageView.tag;
self.leftImageView.tag = (self.leftImageView.tag - 1 + self.images.count) % self.images.count;
}
// 设置图片
self.leftImageView.image = self.images[self.leftImageView.tag];
self.currentImageView.image = self.images[self.currentImageView.tag];
self.rightImageView.image = self.images[self.rightImageView.tag];
// 移动至中间的UIImageView
[self.scrollView setContentOffset:CGPointMake(scrollViewW, 0) animated:NO];
}
@end
.h1
2
3
4
5
6
7
8
9
10
11
12
13
14
15
16
17
18
19
20
21
22
23
24
25
26
27
28
29
30
31
32
33
34
35
36
37
38
39
40
@interface TPCPageScrollView : UIView
/**
 * 图片
 */
@property (strong, nonatomic) NSArray *images;

/**
 * 当前页索引颜色
 */
@property (strong, nonatomic) UIColor *currentPageColor;

/**
 * 非当前页索引颜色
 */
@property (strong, nonatomic) UIColor *otherPageColor;

/**
 * 切换图片间隔
 * 在开启自动切图的情况下,修改时间间隔会实时生效
 */
@property (assign, nonatomic) NSTimeInterval pagingInterval;

/**
 * 开启自动切换图片
 * 会先停止上一次自动切图
 */
- (void)startAutoPaging;

/**
 * 停止自动切换图片
 */
- (void)stopAutoPaging;

/**
 * 以duration时间间隔,开启定时切换图片
 * 会先停止上一次自动切图
 */
- (void)startAutoPagingWithDuration:(NSTimeInterval)pagingInterval;
@end
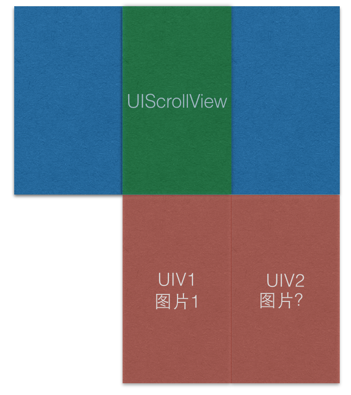
采用两个UIImageView+UIScrollView
这个方法,和上面的方法原理是一样的。
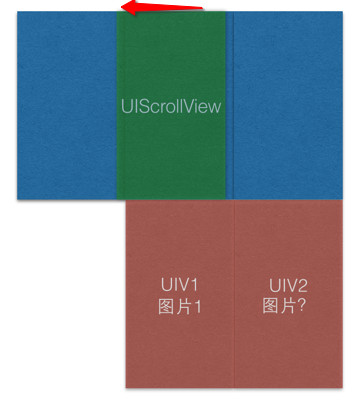
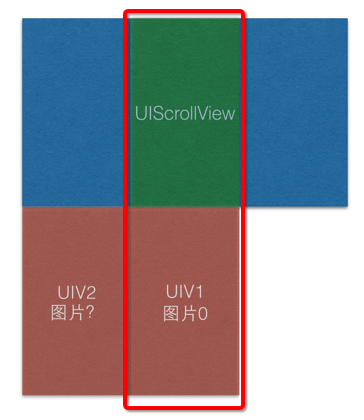
假设使用UIV1表示始终显示的UIImageView,使用UIV2表示备份的UIImageView
- 首先,初始状态如下图所示,显示的是图片1(为了方便查看,我把UIImageView下移了,实际上和上面一排重合)
- 初始状态
- 初始状态
- 这时候,向右边滚动(是滚,不是滑…),UIV2就立即显示图片2,这是,在屏幕可以看见图片1、2
- 向右滚动
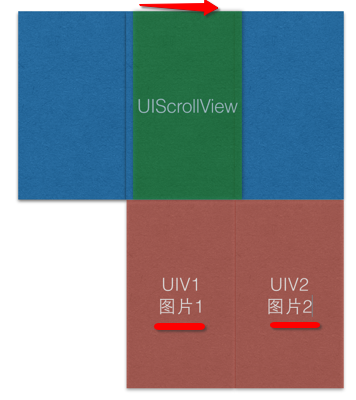
- 向右滚动
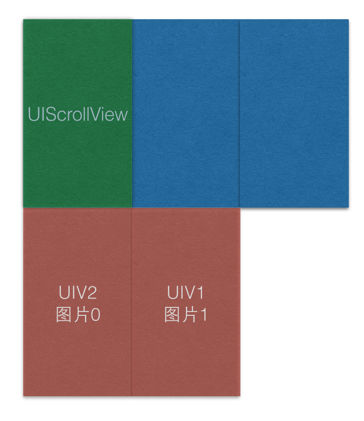
- 当滚动完成时只能看见图片2,如下
- 滚动完成
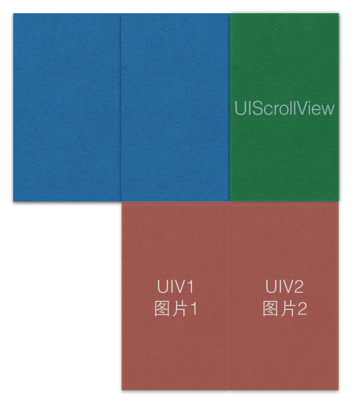
- 滚动完成
- 这是,将UIV1的图片换成图片2,同时将UIScrollView的偏移量设置到中间的位置(这个过程很快,实际看不出来有修改和移动)
- 修改图片
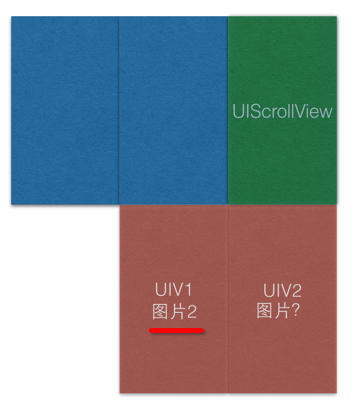
- 修改偏移量
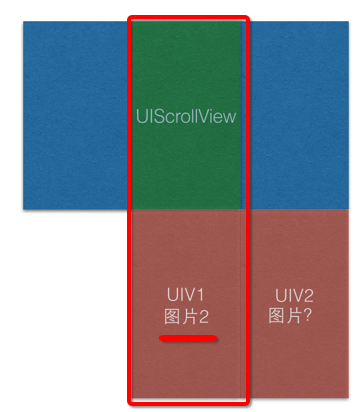
- 修改图片
- 向左滚动的情况
- 左滚动
- 左滚动
- 立即将UIV2的frame修改至最左边的位置,并设置图片为0
- 左滚动修改UIV2图片并移动
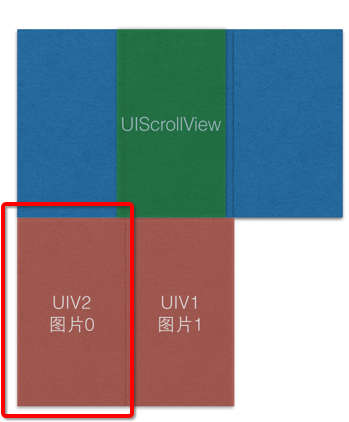
- 左滚动修改UIV2图片并移动
- 修改完成后情况
- 移动完成
- 移动完成
- 修改UIV1图片为图片0,并且设置UIScrollView偏移至中间位置
- 修改UIV1图片
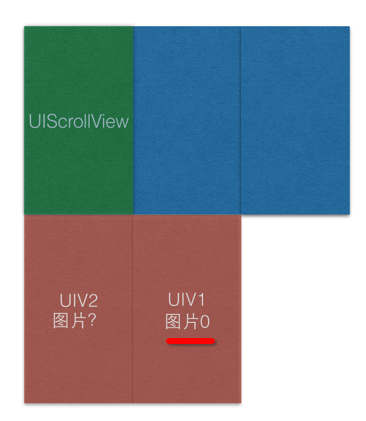
- 最终显示结果
- 修改UIV1图片
实现整体代码如下,有一个小技巧,使用tag标识对应的image,可以使代码更精简:
1 | @interface TPCScrollViewByTwoImageView() <UIScrollViewDelegate> |
使用UICollectionView
因为UICollectionView有cell重用机制,所以只需要两个cell,即可完成上面的功能,内存压力也不会太大。
设置UICollectionView的属性
1
2
3
4
5
6
7
8
9
10
11
12
13
14
15
UICollectionViewFlowLayout *collectionViewLayout = [[UICollectionViewFlowLayout alloc] init];
// 设置cell间距
collectionViewLayout.minimumLineSpacing = 0;
// 设置尺寸为view的大小
collectionViewLayout.itemSize = self.bounds.size;
// 设置为水平滑动
collectionViewLayout.scrollDirection = UICollectionViewScrollDirectionHorizontal;
UICollectionView *collectionView = [[UICollectionView alloc] initWithFrame:self.bounds collectionViewLayout:collectionViewLayout];
collectionView.delegate = self;
collectionView.dataSource = self;
// 设置页切换允许
collectionView.pagingEnabled = YES;
collectionView.bounces = NO;对cell进行注册
1
[collectionView registerClass:[UICollectionViewCell class] forCellWithReuseIdentifier:@"tpc"];
然后根据外界传入的图片,设置数据源方法即可实现了
1 | - (NSInteger)numberOfSectionsInCollectionView:(UICollectionView *)collectionView |
总结
对于前面两种方法,我使用了UIImageView的tag来记录对应图片的下标,所以也省去了一个变量。